Close
0%
0%

Dog Food v2

A Wi-Fi connected reminder light that can send a notification to your phone when you forget to feed the dog.

jonJon
Similar projects worth following
103 views
0 followers
The evolution of one of my first ever projects, this upgrade miniaturizes, updates, and improves on the first version. Now with Wi-Fi, the reminder can set its own clock using NTP, send reminders with IFTTT, and integrate with Home Assistant or other platforms. A built-in IR sensor detects when the food container lid is opened in front of it, or an optional external sensor can be connected to utilize a magnetic reed switch or button.

The OLED screen is only activated when you wave your hand in front of the display to prevent burn-in.

Opening the lid while the sensor is still green will give the option to skip the next feeding reminder. Confirm skipping the next feeding by waving your hand in front of the screen or allow it to time out and the next reminder will go off as scheduled.

Dog Food v2 Cover No IR.stl

Version without LED holes for using external sensor

Standard Tesselated Geometry - 13.36 kB - 06/10/2025 at 16:28

Download

DogFoodV2.ino

ino - 7.08 kB - 06/10/2025 at 16:23

Download

Dog Food v2 Cover.stl

Standard Tesselated Geometry - 87.68 kB - 06/10/2025 at 16:21

Download

Dog Food v2 Base.stl

Standard Tesselated Geometry - 80.84 kB - 06/10/2025 at 16:21

Download

Dog Food v2 Screen Bracket.stl

Standard Tesselated Geometry - 80.94 kB - 06/10/2025 at 16:21

Download

  • 1 × Wemos D1
  • 1 × IR Infrared Obstacle Avoidance Sensor Module https://www.amazon.com/dp/B07W97H2WS
  • 1 × WS2812B LED Strip ~14 LEDs
  • 1 × OLED Display Module I2C IIC 128X64 Pixel 0.96 Inch https://www.amazon.com/dp/B0B7RPCZ4Z
  • 7 × M2 Threaded Heat Inserts

View all 7 components

  • 1
    Print out components

    Print the base and screen bracket, and one of the covers (with or without IR LED holes).

  • 2
    Reverse IR LEDs
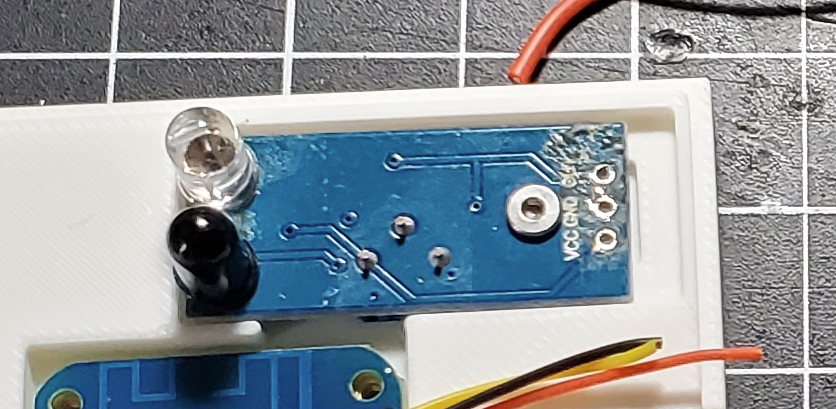
    The IR LEDs on most of the sensors are pointed along the plane of the PCB. Remove the LEDs (paying attention to polarity as it's not normally marked on the PCB) and reinstall them on the back perpendicular to the PCB. The sensitivity dial should be on the opposite side of the LEDs now.
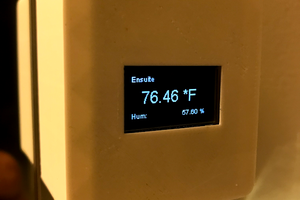
  • 3
    Insert Heat Nuts

    Use a soldering iron or heat set tool to install the 7 3x3 heat set inserts into the screen bracket and base.

View all 4 instructions

Enjoy this project?

Share

Discussions

Similar Projects

Does this project spark your interest?

Become a member to follow this project and never miss any updates